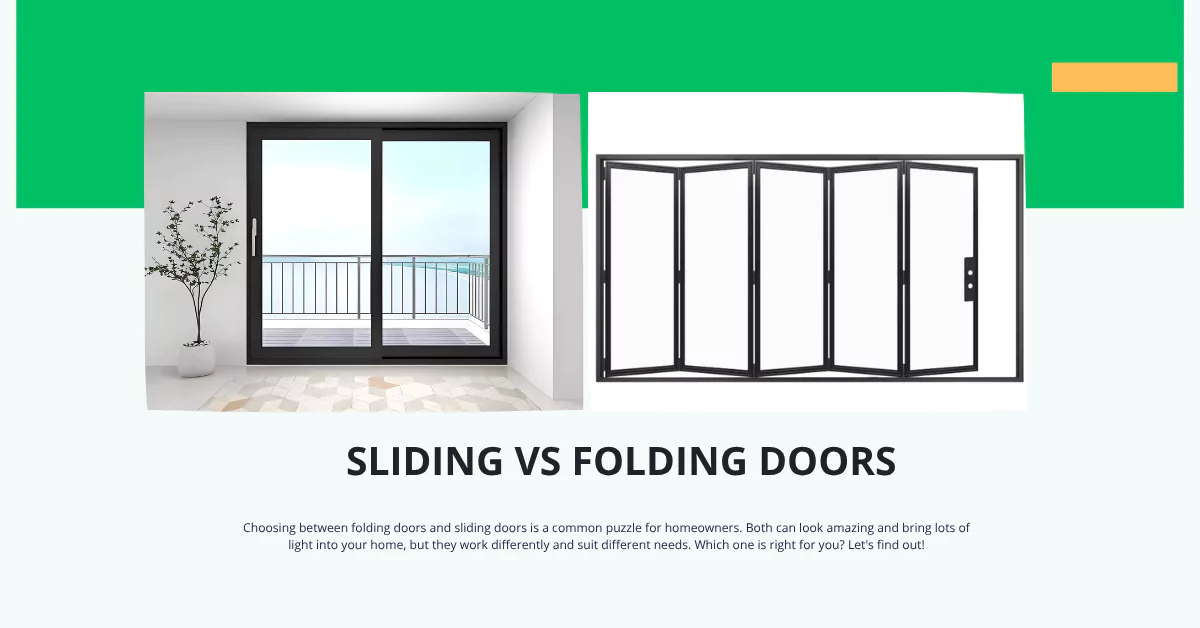
Sliding doors are fantastic space-savers, right? Instead of swinging out into a room, they glide neatly along a wall. Perfect for closets, small rooms, or creating modern room dividers. You can explore different Types of Sliding Doors to see the variety available.
But often, installing a traditional sliding door, especially a barn door style, involves mounting a heavy metal track system to the wall above the door. This usually requires finding studs, drilling multiple large holes, and sometimes even installing a sturdy header board for extra support. What if you can’t or don’t want to do all that? Maybe you’re renting and can’t drill major holes? Maybe the wall above the door isn’t suitable for heavy hardware? Or perhaps you just prefer a more minimalist look without a prominent track?
Good news! There are ways to install sliding doors with minimal or even no intense wall hardware. These methods often rely on floor tracks, clever bracket systems, or ceiling mounts.
This guide will walk you through these alternative installation methods, helping you understand:
- The different types of systems that avoid heavy wall tracks.
- How to assess your space to see if these methods will work.
- The tools and materials you’ll need.
- Step-by-step guides for different minimal-impact installation techniques.
- Troubleshooting common issues.
Let’s find a sliding solution that works for your space without needing major wall surgery!
Understanding Your Options: Sliding Door Systems with Minimal Wall Impact
Sliding Door Systems Comparison
| ⬇️ Floor-Track | ↔️ Wall-Mounted | ⬆️ Ceiling-Mounted | ⚙️ Trackless | |
|---|---|---|---|---|
| Wall Impact | Minimal | Moderate | Minimal | Variable |
| Weight Capacity |
|
|
|
|
| Installation Difficulty |
|
|
|
|
| Floor Track | Yes | No | No | Concealed |
| Trip Hazard | Yes | No | No | Minimal |
| Key Feature | Weight on floor | Distributed brackets | Ceiling mounted | Concealed guides |
| More Details |
Floor-Track Systems
Weight-bearing track on floor with minimal wall guides. These systems put the main weight-bearing track on the floor. Rollers are attached to the bottom of the door, gliding along this floor track. The wall only needs a small guide bracket near the top.
- Takes most weight off the wall
- Allows for heavier doors without robust wall support
- Very stable if floor track is well-installed
- Good for areas with weak wall structures
- Visible track on the floor
- Can be a trip hazard
- Collects dirt and requires cleaning
- Requires drilling into floor (not renter-friendly)
- May damage certain floor types
Wall-Mounted Systems
Distributed weight with minimal header/clamps. Instead of one long, heavy track, these use multiple smaller brackets distributed along the wall, ideally mounted into wall studs. This distributes the weight across several points.
- No floor track
- Cleaner look than traditional barn door hardware
- Works when solid backing above doorway is unavailable
- No trip hazards or floor obstructions
- Requires drilling into wall studs
- Lower weight capacity than heavy-duty systems
- Needs precise measurement for level installation
- Multiple wall mounting points
Ceiling-Mounted Options
Track mounted directly to ceiling joists or blocking. The track hardware is mounted directly to the ceiling joists or to blocking installed between joists above the drywall. The door hangs from rollers on this ceiling track.
- Very clean, minimalist look
- No visible wall hardware above door
- No floor track or obstruction
- Great for creating room dividers
- Ceiling structure must be strong
- Finding joists accurately is crucial
- Installation more difficult working overhead
- Lower weight capacity than wall systems
“Trackless” Floor Systems
Concealed guides with grooved door bottom. These don’t eliminate tracks entirely, but hide them. Often, the door has a groove on the bottom edge that runs over a small, discreet floor guide pin or roller. Main support comes from minimal ceiling or wall guide.
- No visible floor track to trip over
- Very clean aesthetic
- Easier to clean floor
- Visually unobtrusive solution
- Requires precisely grooved door bottom
- Floor guide still needs secure mounting
- Less stable for very heavy/wide doors
- Limited weight capacity
Forget the big, bulky header track for a moment. Here are the main ways to hang a sliding door with less fuss on the wall itself:
A. Floor-Track Systems with Minimal Wall Guides
- How they work: These systems put the main weight-bearing track on the floor. Rollers are attached to the bottom of the door, gliding along this floor track. The wall usually only needs a small, discreet guide bracket near the top or side to keep the door stable and prevent it from tipping.
- Pros: Takes most weight off the wall, potentially allowing for heavier doors without needing a super-strong wall header. Can feel very stable if floor track is well-installed.
- Cons: Visible track on the floor (can be a trip hazard or collect dirt), requires drilling into the floor (might not be ideal for renters or certain floor types like tile).
- Weight Limits: Often higher than ceiling/minimal wall options, but check manufacturer specs.
- Best Applications: Closets, room dividers where a floor track isn’t too intrusive. Can be residential or light commercial.
B. Wall-Mounted Systems with Distributed Weight (Minimal Header/Clamps)
- How they work: Instead of one long, heavy track needing extensive support, these use multiple smaller brackets or “clamp” systems (like Freedom Clamp hardware) distributed along the wall. These brackets are ideally mounted directly into wall studs. The track then attaches to these brackets. This distributes the weight across several points rather than concentrating it. It avoids the need for a continuous solid header board above the door.
- Pros: No floor track, cleaner look than traditional heavy barn door hardware, can work if solid backing above the entire doorway is unavailable (but studs are needed).
- Cons: Still requires drilling into wall studs, weight capacity is lower than heavy-duty tracks, careful measurement needed to align brackets perfectly level.
- Best Applications: Interior doors (bedrooms, closets), lighter weight door panels.
C. Ceiling-Mounted Options
- How they work: The track hardware is mounted directly to the ceiling joists or to blocking installed between joists above the drywall. The door hangs from rollers on this ceiling track. No major wall hardware needed below the track.
- Pros: Very clean, minimalist look with no visible wall hardware above the door, no floor track. Great for creating room dividers or closet doors where floor is uninterrupted.
- Cons: Ceiling structure must be strong enough (mounting directly to drywall alone will fail!). Finding joists accurately is crucial. Installation can be trickier working overhead. Lower weight capacity than robust wall tracks.
- Tension Rods (Temporary): For very lightweight doors (like fabric panels or thin foam core) in temporary situations (rentals, event spaces), specialized heavy-duty tension rods might work, but stability and weight capacity are extremely limited. Not a reliable solution for standard doors.
D. “Trackless” Floor Systems (Concealed Guides)
- How they work: These don’t eliminate tracks entirely, but they hide them. Often, the door has a groove on the bottom edge that runs over a very small, discreet floor guide pin or roller. The main support might still come from a minimal ceiling or wall guide system, but the floor guide replaces a visible floor track.
- Pros: No visible floor track to trip over or clean. Very clean look.
- Cons: Requires grooving the bottom of the door precisely. Floor guide still needs secure mounting. Might be less stable for very heavy or wide doors compared to a full floor track.
Understanding what is a sliding door in general helps picture how these mechanisms differ from standard hinged doors.
Assessing Your Space: What You Need to Know Before Starting
Before choosing a minimal hardware system, check your space carefully!
A. Door Size and Weight Calculations:
- Measure Opening: Accurately measure the height and width of the opening you want to cover. The door slab needs to be slightly wider (by 1-2 inches) and taller (by ~1 inch) than the opening to ensure coverage and privacy. Check average door size for typical dimensions.
- Calculate Door Weight: This is CRITICAL for minimal systems! Hollow core doors are much lighter than solid core or doors with large glass inserts. Weigh your door if possible, or check manufacturer specs. Most minimal hardware kits have strict weight limits (often 50-150 lbs, compared to 200-400+ lbs for heavy-duty tracks).
- Clearance: Ensure you have wall space beside the opening for the door to slide fully open. Ceiling systems need vertical clearance. Floor tracks need clear floor space.
B. Wall Structure Assessment:
- Identify Wall Type: Drywall over wood studs is most common. Plaster walls are harder to work with. Concrete/brick requires specialized masonry anchors.
- Find Studs: Use a reliable electronic stud finder (or traditional methods) to locate and mark wall studs accurately. Distributed wall brackets and even minimal top guides usually need secure anchoring into studs.
- Evaluate Mounting Points: Are studs conveniently located where brackets need to go? Is the wall structure solid?
C. Floor Considerations:
- Floor Material: Drilling into hardwood or concrete for floor tracks/guides requires appropriate bits. Tile can crack easily if not drilled carefully (often best avoided). Carpet can interfere with floor tracks or low guides.
- Levelness: Is your floor reasonably level? An unlevel floor can cause issues with floor-track systems.
- Protection: Use drop cloths or pads to protect flooring during installation.
D. Door Selection Tips:
- Go Lighter: For minimal wall/ceiling systems, choose hollow core doors or lightweight engineered wood doors if possible. Solid wood or heavy glass doors are usually too heavy.
- Material Matters: Consider Vinyl vs. Aluminum Sliding Doors if looking for lightweight panel options, though wood and composite are common too.
- Sizing: Ensure the door slab overlaps the opening adequately on the sides and top.
Comprehensive Tools and Materials List
Gather your gear! Specifics depend on the method, but generally:
A. Essential Tools:
- Tape Measure
- Level (4-foot recommended for accuracy)
- Pencil / Marker
- Drill/Driver with various bits (including pilot bit, Phillips head, maybe spade bit or Forstner bit for recessed hardware)
- Good Electronic Stud Finder
- Safety Glasses & Gloves!
- Ladder (for ceiling work)
- Utility Knife
- Pry Bar (optional, for adjustments)
- Rubber Mallet (optional, for tapping things into place)
B. Hardware Options (Examples – Check Specific Kits):
- No-Drill Floor Guides: Often plastic or metal pieces that mount to the wall/baseboard and guide the bottom of the door (which needs a groove). Look for brands like CCJH, WINSOON, SmartStandard online – they offer various low-profile floor guide designs.
- Minimal Wall Hardware: Look for “low profile sliding door hardware,” “bypass door hardware” (sometimes adaptable), or specific systems like “Freedom Clamp.” These often involve individual brackets rather than a long bar.
- Ceiling Track Hardware: Specific kits designed for ceiling mount, including track, rollers, and mounting brackets/plates.
- Adhesive Options: Heavy-duty double-sided mounting tape (e.g., 3M VHB) might work for extremely lightweight panels or temporary guides, but generally not recommended for bearing door weight or permanent fixtures. Use with extreme caution and test thoroughly.
C. Materials Checklist by Method (General):
- All Methods: Door Slab, Sliding Door Hardware Kit (rollers specific to your chosen track type), Handle/Pull for sliding door, Door Stops (floor or wall mounted, specific to system).
- Floor Track: Floor track material, Top guide bracket(s), Fasteners for floor/wall.
- Wall-Mounted (Minimal): Track mounting brackets (multiple), Track, Fasteners for studs.
- Ceiling-Mounted: Ceiling track, Ceiling mounting plates/brackets, Fasteners for joists/blocking.
Step-by-Step Installation Methods
IMPORTANT: Always read and follow the specific instructions that come with YOUR chosen hardware kit! These are general guides. Basic door installation principles can be found in a standard sliding doors installation guide, but these methods adapt those principles.
Installation Methods Glimps
Method 1: Floor-Track System
▼-
Prep
Measure and mark track location precisely on floor. Prepare door (attach bottom rollers per kit instructions). Protect floor.
-
Install Floor Track
Align track carefully. Secure using appropriate screws for your floor type (pre-drill if needed). Ensure it’s perfectly straight.
-
Add Wall Guide
Determine top guide placement. Mount small guide bracket securely to wall (ideally into a stud).
-
Mount Door
Carefully lift door, engaging bottom rollers onto floor track. Tip top of door towards wall, engaging the top guide.
-
Test & Adjust
Slide door fully open/closed. Check for smooth operation. Adjust guide position if needed.
Method 2: Distributed Bracket System
▼-
Prep
Locate and clearly mark all wall studs above the doorway. Determine bracket height based on door height + roller clearance.
-
Install Brackets
Mount brackets securely into studs at the correct height. Use your level to ensure they are perfectly level with each other.
-
Install Track
Attach the sliding track bar to the installed brackets according to kit instructions. Double-check level.
-
Mount Door
Carefully lift the door and hang the rollers onto the track.
-
Test & Adjust
Slide door. Install door stops. Adjust roller height if needed for smooth operation.
Method 3: Ceiling-Mounted System
▼-
Prep
Use stud finder to locate ceiling joists accurately. Mark joist locations. Prepare door with appropriate rollers.
-
Install Ceiling Hardware
Secure mounting plates or brackets directly into ceiling joists using appropriate lag screws or bolts.
Do NOT mount heavy doors only to drywall!
-
Install Track
Attach track to ceiling mounts, ensuring it’s perfectly level and parallel to the wall.
-
Mount Door
Carefully lift door (might need two people!) and hook rollers onto the ceiling track.
-
Test & Adjust
Slide door. Install door stops. A small floor guide might still be needed to prevent swaying.
Method 4: Renter-Friendly Installation
▼For very lightweight panels (fabric, foam board) and temporary situations only.
-
Prep
Choose lightest possible “door” panel. Identify potential non-damaging mount points.
Not suitable for actual doors or heavy panels!
-
Tension System
Use a heavy-duty tension rod if the span is short and the panel is extremely light.
-
Adhesive Mounting
Command strips or VHB tape might hold a very lightweight guide strip if weight is minimal.
-
Mount Panel & Test
Attach panel using appropriate hooks/clips. Test stability thoroughly.
Method 1: Floor-Track System with Minimal Wall Guide
- Prep: Measure and mark track location precisely on floor. Prepare door (attach bottom rollers per kit instructions). Protect floor.
- Install Floor Track: Align track carefully. Secure using appropriate screws for your floor type (pre-drill if needed). Ensure it’s perfectly straight.
- Add Wall Guide: Determine top guide placement (usually aligns with track, near one end of door travel). Mount small guide bracket securely to wall (ideally into a stud or using robust drywall anchors if absolutely necessary and door is light).
- Mount Door: Carefully lift door, engaging bottom rollers onto floor track. Tip top of door towards wall, engaging the top guide.
- Test & Adjust: Slide door fully open/closed. Check for smooth operation. Adjust guide position if needed. Install floor-mounted door stops at ends of track travel.
Method 2: Freedom Clamp / Distributed Bracket System (Minimal Header)
- Prep: Locate and clearly mark all wall studs above the doorway where brackets will go. Determine bracket height based on door height + roller clearance (follow kit specs!). Prepare door (attach top rollers).
- Install Brackets: Mount the first bracket securely into a stud at the correct height. Use your long level to mark the height for the next bracket. Mount remaining brackets into studs, ensuring they are perfectly level with each other.
- Install Track: Attach the sliding track bar to the installed brackets according to kit instructions. Double-check level.
- Mount Door: Carefully lift the door and hang the rollers onto the track.
- Test & Adjust: Slide door. Install door stops (usually mount onto the track bar itself). Adjust roller height if needed for smooth operation.
Method 3: Ceiling-Mounted System
- Prep: Use stud finder to locate ceiling joists accurately above where the track will run. Mark joist locations. Prepare door (attach top rollers specific to ceiling track).
- Install Ceiling Hardware: Secure mounting plates or brackets directly into ceiling joists using appropriate lag screws or bolts specified by the kit. If joists don’t align perfectly, you may need to install solid wood blocking between joists first (accessible from attic or requires cutting/patching ceiling drywall), then mount track hardware to the blocking. Do NOT mount heavy doors only to drywall!
- Install Track: Attach track to ceiling mounts, ensuring it’s perfectly level and parallel to the wall.
- Mount Door: Carefully lift door (might need two people!) and hook rollers onto the ceiling track.
- Test & Adjust: Slide door. Install door stops. Adjust rollers if needed. A small floor guide might still be needed to prevent swaying.
Method 4: Renter-Friendly Temporary Installation (Use with Caution!)
This is for very lightweight panels (fabric, foam board) and temporary situations only. Stability and durability are limited.
- Prep: Choose lightest possible “door” panel. Identify potential non-damaging mount points.
- Tension System: Use a heavy-duty shower curtain rod or specialized room divider tension rod rated for sufficient weight if the span is short and the panel is extremely light. Test stability thoroughly. Not suitable for real doors.
- Adhesive Mounting: Heavy-duty Command strips or VHB tape might hold a very lightweight top guide strip or minimal track if the surface is suitable (clean, smooth, non-porous) and weight is minimal. Test adhesion strength carefully! Risk of falling/damage is high. Removal might still damage paint/drywall.
- Mount Panel: Attach panel using appropriate hooks/clips for tension rod or light rollers for adhesive track.
- Test: Check stability. Understand this is temporary and not very robust.
Finishing Touches and Hardware
- Handles: Choose flush pulls (recessed into door) or low-profile surface-mount handles that won’t interfere with sliding past the wall or frame. Understanding the standard parts of a door helps select compatible hardware.
- Stops/Guides: Install stops to prevent the door sliding too far. Minimal floor guides (pin or roller type) are often needed even with ceiling/wall tracks to prevent the bottom from swinging out.
- Privacy: Ensure door overlaps opening sufficiently. Small gaps can be sealed with brush seals attached to the door edge or frame if needed. Sliding door locks are available (hook locks, mortise locks), but might require specific door prep.
- Decoration: Consider minimalist trim around the opening if desired, or leave it clean for a modern look.
Troubleshooting Common Issues
These minimal systems can sometimes be finicky.
- Alignment: Door not hanging straight or hitting frame? Check if track (floor, wall, or ceiling) is perfectly level. Adjust rollers if they have height adjustment. Ensure walls/floor are reasonably plumb/level.
- Stability: Door feels wobbly? Ceiling/wall mounts might need reinforcement (ensure they hit joists/studs). Floor track might need better securing. A bottom guide is often essential for stability.
- Movement: Door hard to slide? Check track/rollers for debris. Lubricate rollers lightly (silicone spray). Is door warping/rubbing? Fixing a tough slider shares principles with our sliding door hard to open fix guide.
- Hardware Failure: Minimal hardware has lower tolerances. Ensure door weight is within limits. Check fastener tightness periodically.
Maintenance and Care
- Keep floor tracks/guides clean from dust and debris (vacuum regularly).
- Wipe down ceiling/wall tracks occasionally.
- Check rollers for smooth operation; lubricate bearings lightly if needed per manufacturer advice.
- Check all mounting screws/bolts periodically to ensure they remain tight.
Specialized Applications
- Closets: Floor tracks or minimal wall/ceiling mounts work well. Bifold doors are another space-saving closet option – see Bifold door sizes.
- Room Dividers: Ceiling tracks offer the cleanest look for dividing spaces without a floor interruption. Ensure system can handle the width/weight if using large panels.
- Bathrooms: Ensure hardware finishes are moisture-resistant. Privacy is key – ensure good overlap and consider latching/locking options.
Product Recommendations and Comparison (General Types)
- No-Drill Floor Guides: Search online retailers (Amazon, etc.) for “sliding door floor guide wall mount” or “no drill floor guide.” Brands like CCJH, WINSOON, SmartStandard often appear. Compare designs (roller vs. L-shape), material (metal vs. plastic), adjustability, and reviews.
- Minimal Wall Hardware: Look for “low profile barn door hardware,” “top mount sliding door hardware,” or specific systems like “Freedom Clamp.” Compare weight ratings, bracket design, track material, and price.
- Renter-Friendly: Focus on tension systems designed for room dividers (check weight limits!) or high-strength adhesive solutions (use cautiously).
Conclusion: Slide Into Style, Minimally!
Yes, you absolutely can install a stylish and functional sliding door without resorting to heavy, intensive wall hardware! Systems using floor tracks, distributed wall brackets, or ceiling mounts offer fantastic alternatives.
The keys to success are:
- Careful Planning: Accurately assess your space, wall/ceiling structure, and floor.
- Weight Matters: Choose a door panel light enough for your chosen minimal hardware system.
- Choose the Right System: Match the system (floor, wall, ceiling) to your space constraints, structural capacity, and aesthetic goals.
- Precise Installation: Follow manufacturer instructions carefully, ensuring everything is level and securely mounted (hitting studs/joists is crucial for wall/ceiling systems!).
While these methods might have lower weight limits or require more careful installation than traditional heavy-duty tracks, they open up possibilities for renters, those with tricky walls, or anyone seeking a cleaner, more modern sliding door look.
Looking for the perfect lightweight or custom-sized door for your minimal hardware project? Explore our options or design your own custom sliding door from us! We partner with top manufacturers like Hotian to offer quality and style. Let’s get your space sliding!